1
2
3
4
5
6
7
8
9
10
11
12
13
14
15
16
17
18
19
20
21
22
23
24
25
26
27
28
29
30
31
32
33
34
35
36
37
38
39
40
41
42
43
44
45
46
47
48
49
50
51
52
53
54
55
56
57
58
59
60
61
62
63
64
65
66
67
68
69
70
71
72
73
74
75
76
77
78
79
80
81
82
83
84
85
86
87
88
89
90
91
92
93
94
95
96
97
98
99
100
101
102
103
104
105
106
107
108
109
110
111
112
113
114
115
116
117
118
119
120
121
122
123
124
125
126
127
128
129
130
131
132
133
134
135
136
137
138
139
140
141
142
143
144
145
146
147
148
149
150
151
152
153
154
155
156
157
| \documentclass[xcolor=svgnames]{beamer}
\usecolortheme[named=PowderBlue]{structure} %structure
\useoutertheme{infolines}
\usetheme[height=7mm]{Madrid} %Rochester
\setbeamertemplate{items}[ball]
\setbeamertemplate{blocks}[rounded][shadow=true]
\setbeamertemplate{navigation symbols}{}
\setbeamertemplate{background canvas}[vertical shading][left=PowderBlue!10,middle=white,right=PowderBlue!10]
\usepackage{xeCJK}
\setCJKmainfont{SimSun}
\usepackage{tikz}
\usetikzlibrary{shapes,arrows}
\hypersetup{ pdfpagemode={FullScreen}}
\title{Beamer 样例}
\subtitle{这是副标题}
\author{Z.H. Fu}
\institute[BUAA]{
北京航空航天大学 \\
中国·北京
}
\date{2014年3月25日}
\begin{document}
\begin{frame}[plain]
\titlepage
\end{frame}
%----------- slide -------------%
\begin{frame}{Outline of the talk}
\begin{itemize}
\item Introduction
\pause
\item Statement of the main theorem
\pause
\item Technical lemmata
\pause
\item Proof of the main theorem
\pause
\item Conclusions
\end{itemize}
\end{frame}
%----------- slide -------------%
\begin{frame}{例子}
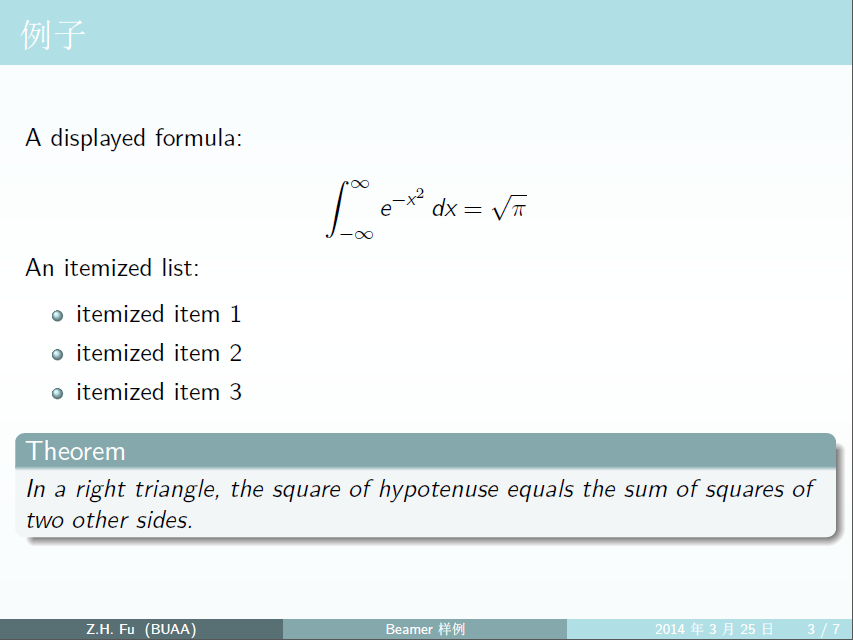
A displayed formula:
\[
\int_{-\infty}^\infty e^{-x^2} \, dx = \sqrt{\pi}
\]
An itemized list:
\begin{itemize}
\item itemized item 1
\item itemized item 2
\item itemized item 3
\end{itemize}
\pause
\begin{theorem}
In a right triangle, the square of hypotenuse equals
the sum of squares of two other sides.
\end{theorem}
\end{frame}
\begin{frame}{Theorems and such}
\pause
\begin{definition}
A triangle that has a right angle is called
a \emph{right triangle}.
\end{definition}
\pause
\begin{theorem}
In a right triangle, the square of the hypotenuse
equals the sum of the squares of the two other sides.
\end{theorem}
\pause
\begin{proof}
We leave the proof as an exercise to our astute reader.
We also suggest that the reader generalize the proof to
non-Euclidean geometries.
\end{proof}
\end{frame}
\begin{frame}{流程图}
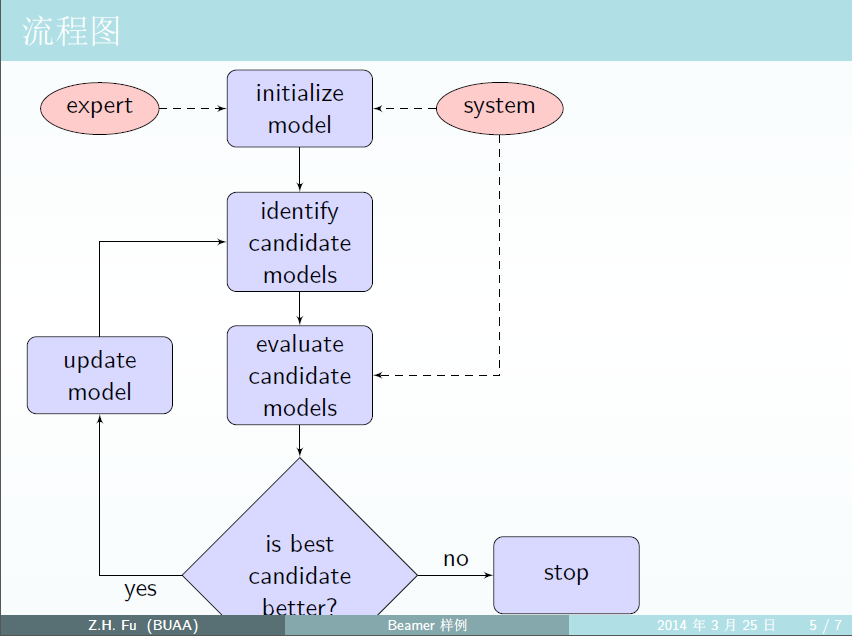
\tikzstyle{decision} = [diamond, draw, fill=blue!15,
text width=6em, text badly centered, node distance=3cm, inner sep=0pt]
\tikzstyle{block} = [rectangle, draw, fill=blue!15,
text width=5em, text centered, rounded corners, minimum height=3em]
\tikzstyle{line} = [draw, -latex']
\tikzstyle{cloud} = [draw, ellipse,fill=red!20, node distance=3cm,
minimum height=2em]
\begin{tikzpicture}[node distance = 2cm, auto]
% Place nodes
\node [block] (init) {initialize model};
\node [cloud, left of=init] (expert) {expert};
\node [cloud, right of=init] (system) {system};
\node [block, below of=init] (identify) {identify candidate models};
\node [block, below of=identify] (evaluate) {evaluate candidate models};
\node [block, left of=evaluate, node distance=3cm] (update) {update model};
\node [decision, below of=evaluate] (decide) {is best candidate better?};
\node [block, right of=decide, node distance=4cm] (stop) {stop};
% Draw edges
\path [line] (init) -- (identify);
\path [line] (identify) -- (evaluate);
\path [line] (evaluate) -- (decide);
\path [line] (decide) -| node [near start] {yes} (update);
\path [line] (update) |- (identify);
\path [line] (decide) -- node {no}(stop);
\path [line,dashed] (expert) -- (init);
\path [line,dashed] (system) -- (init);
\path [line,dashed] (system) |- (evaluate);
\end{tikzpicture}
\end{frame}
\begin{frame}{Splitting a slide into columns}
The line you are reading goes all the way across the slide.
From the left margin to the right margin. Now we are going
to split the slide into two columns.
\bigskip
\begin{columns}
\begin{column}{0.5\textwidth}
Here is the first column. We put an itemized list in it.
\begin{itemize}
\item This is an item
\item This is another item
\item Yet another item
\end{itemize}
\end{column}
\begin{column}{0.3\textwidth}
Here is the second column. We will put a picture in it.
\end{column}
\end{columns}
\bigskip
The line you are reading goes all the way across the slide.
From the left margin to the right margin.
\end{frame}
\begin{frame}[c]{} % [c] is the default
\begin{center}\Huge
谢谢!
\end{center}
\end{frame}
\end{document}
|

